Archive

Monthly Archives: December 2013

20131231-134801.jpg

2013 has been quite a year. I started nursing school, started this blog, moved to Philly. I lost a good friend and made a few new ones. This upcoming year I will be finishing nursing school, finding a job and probably moving again. Here are my concrete goals for the year.

1. Keep sewing, and blogging
Sewing is one of my favorite things in life. I have had trouble making enough time for it in my busy schedule, but starting this blog has forced me to be good to myself and make time to sew. I’m continuing these in 2014. I’m committing to one sewing or DIY post each week.
2. Exercise
Always a challenge when busy. I’m aiming to swim a mile once a week, do Pilates or yoga once a week, and do one more hour of cardio per week (maybe biking or running). That’s three things, three hours, which feels like a manageable goal.
3. Be present
I tend to get overwhelmed thinking about all the things on my plate at once. This year I’m putting effort into being present, staying in the moment, and trying to enjoy things as they come.

Here’s to the new year, and here’s hoping that it holds continued healing and good things in store for everyone.

20131228-220220.jpg

I do yoga. I have kept a yoga practice on and off since I was in middle school. I’ve been carrying my yoga mat around since then without a bag, and I finally decided it was high time to make one.

20131228-215932.jpg

Pinspiration!

20131225-151148.jpg

I have mixed feelings about my yoga practice. On one hand, it keeps me sane (not to mention flexible) when things get busy. On the other hand, I recognize that yoga is a religious practice, so Try to pay it the respect I feel it deserves. I use yoga to find inner quiet, and I pay attention to my breathing and try to be mindful. I usually listen to a podcast (20 minute Yoga Download and Yoga To The People are my favorites). For anyone in the State College, PA area, Lila Yoga is one of the best studios I have attended. I’d definitely recommend looking it up.

I made this bag entirely from fabric scraps, including leftover fabric from the curtains my parents have in their room.

You need:
Fabric- heavy duty, like upholstery fabric
Leather
Fabric decorations
An old belt

20131225-144334.jpg

What I did:

Cut out a 20×30 inch piece of heavy upholstery fabric.

20131225-144212.jpg

Decorate it! Pin and then sew on decorations.

20131225-144624.jpg

20131225-144630.jpg

20131225-144655.jpg

20131225-144728.jpg

I used bias tape, ribbon, striped fabric and leather. I sewed the leather around the bottom if the bag to make it more durable. Also it looks cool!
Fold the fabric in half, hotdog style, and sew/serge the long edge. Cut the belt in half and sew it on with a big square that has an X in the middle. Make sure you do this before you put the bottom on.
Cut out a circle from the leather about 7 inches in diameter. Pin right sides together and sew it to the bottom of the bag. Mine looked like this once I flipped it right side out.

20131225-145514.jpg

To finish the top of the bag, I turned the fabric over twice to make a thick hem and sewed it down. I attached the top of the strap at this time.

20131225-145825.jpg

That’s it! I serged the inside edges as I went along. Total time to completion was about two hours (or the run time of the movie of The Color Purple). I thought about adding a drawstring to the top, but found that the bag didn’t need a drawstring to hold the mat inside.

20131228-220202.jpg

20131228-220409.jpg

20131228-220142.jpg

20131214-193434.jpg

I got snowed in again last week! The snow started coming down so fast and heavy on my drive home that I was a little afraid I wouldn’t make it. It took me an hour and a half to make a 15 minute drive. Scary.
Anyway, I got home and didn’t have many ingredients on hand, so I decided to make these enchiladas. They were great comfort food for the snowy evening.

You need:
Tortillas
Olive oil
2 cloves of garlic
Half a yellow onion, sliced
1 cup shredded purple cabbage (or other vegetable you have on hand)
1 can of seasoned black beans
Cheese
Enchilada sauce (I used an 8 oz can of green enchilada sauce)

Preheat oven to 350 F.

Sauté onions and garlic until the onion starts to turn clear. Add shredded cabbage and cook till soft.

20131214-221920.jpg

20131214-221929.jpg

Oil a square baking pan and line up tortillas inside. I was able to fit 5 in my pan.

20131214-222316.jpg

Fold up the ends of the tortillas and layer beans, cheese, and veggies inside. Then roll up the tortillas, pour the enchilada sauce into the pan, and sprinkle with cheese.

20131214-222540.jpg

20131214-222551.jpg

20131214-222600.jpg

Bake for 20-30 minutes, until the cheese is golden and bubbling on top. Let cool for 10 minutes before serving. It is hard to see the green sauce in the photos, but it is really delicious. It has a more mild flavor than the red sauce, more like tomatillos than tomatoes. One of my favorites.

20131214-222745.jpg

20131214-222751.jpg

What are some of your favorite snowy day dinners?

20131204-105428.jpg

We had some leftover beeswax from our honey harvest this year. Most we gave to a friend, but I kept a little because I wanted to try making a few things, namely some candles. It takes a lot more beeswax then I thought to make a candle, so I only ended up with one, but this recipe can be extended to make other candles.

What you need:
Beeswax
Paraffin wax
(1 part paraffin to 2 parts beeswax)
Two plastic cups (preferably cups you don’t care about)
Dixie cups
Spray oil
Cheesecloth
4 clothes pins
Candle wicks (or string)
A pot (stovetop)

1. Put all the beeswax into one of the cups, and then into the pot. Fill up the pot with water as much as possible without making the cup of beeswax float. This will act as a double boiler to melt the wax. Turn the stove on high until the water boils, then turn the heat down a little. Stay with the wax the whole time it melts.

20131208-161606.jpg

2. While the wax is melting, liberally spray the Dixie cup with spray oil and then refrigerate it.

3. If you are using raw beeswax (like I did), fold up the cheesecloth (I folded it in half twice) and use clothespins to hold it over the opening of the second cup.

20131208-161555.jpg

Once the beeswax has completely melted, pour it through the cheesecloth into the second cup. Using a spoon to clear the propolis from the cloth will push the wax through the cheesecloth faster.

20131214-184029.jpg

The beeswax will cool off while you are pouring it into the second cup. Add the paraffin wax to the beeswax and then place the cup back into the boiling water. You will need to add more water since some has boiled off.

20131214-190834.jpg

Set up the candle mold. Use a drop of wax to hold the bottom of the wick to the bottom of the mold, and a clothespin propped across the top to hold the wick straight up. I tried itfirst with a pen and Hanukkah candles, but it didn’t work. Make sure to keep an eye on the wax. When the wax is melted, pour it into the mold.

20131214-191729.jpg

20131214-191745.jpg

Let the wax cool completely, for 3-4 hours. The candle will pull away from the sides of the mold, and you can peel the paper cup off if it is stuck to get it out. Then trim the wick. Carefully trim the edges of the top with a knife.

20131214-192324.jpg

20131214-192405.jpg

Here is my candle on the window sill. I put it on a little dish to contain the wax. It smells faintly like honey when I burn it! Next year I’m going to save more wax to make more candles. I’m also going to try making lotion bars. Patience, Claire, patience!

20131214-192440.jpg

Mid-week procrastination dictated that I bring you some delicious, cute and inspiring things I’ve found recently. Enjoy!

Nutella banana s’mores

20131218-115610.jpg

Gocco prints- when I have more time I’m going to get one of these and screen print my heart out. The Gocco system looks so much easier than the traditional method I’ve used in the past.

20131218-115547.jpg

20131218-132541.jpg

designs from WooStar

20131218-120807.jpg

weird and slightly inappropriate mug

20131218-130904.jpg

Doodles

20131218-132002.jpg

And finally, the best thing of all is that this is my last week of class and tests before winter break! I’m ready for some serious relaxation. First on the agenda is a visit to this wonderful distillery where my sister works.

20131218-120626.jpg

// s’more picture from camping trip this fall// Gocco print #1 // Gocco print #2// textile design for iPhone from WooStar// roommate’s mug// my own doodles//

Here is the second post in my Uniquely You dress form saga!
Where I left off last post, I had just finished putting darts in the side front and back panels of the dress form cover. I had also fit the neck and shoulders. In steps 3 and 4, I fit the upper torso and bust. I needed an extra pair of hands for all the pinning. I also chose my bra carefully, and wore the bra that I usually wear while pin fitting the cover.

Step 3:
First you put on the cover, with the side seams still open. Then, pin the side seams, from the waist up to the underarm. On me, the side seams barely met below the bust. The instructions say to release the side front and side back seams if this is the case. I let out the side front and side back seams about an inch each, below the bust only. After I ripped the seams from just under the bust down to the bottom of the cover, I re-sewed the seam from under the bust to the natural waistline.

20131216-180906.jpg

20131216-180918.jpg

20131216-180924.jpg

Step 4: the bust!
The first instruction in step 4 is to make sure the front seams cross the bust points. It says to adjust the seams if they do not cross the bust points. I skipped this, because it mentions a good way to do this later on in the instructions.*
Next it says to pin the side front seams between the bust point and shoulder. You follow the hollow of the upper chest to make the cover fit the top of the bust. I ripped these seams open and re pinned them. *This is also where I adjusted the seams to cross the bust points. Again, we are working on the side front seams here.

20131216-182050.jpg

20131216-182101.jpg

The pinning was so specific that I was afraid to flip the pins to the other side without losing some of the shape. I topstitched the seam close to the edge to keep the shape as much as possible.

20131216-182943.jpg

20131216-182949.jpg

Next, it says to “nip in tightly under the bust” and pin the underside of the bust. The cover fit me pretty well here, so I just made a small adjustment under the bust. You can see in the picture below that I marked with pins the area that did not fit tightly. I made a little dart to remedy this.

20131216-182635.jpg

20131216-182638.jpg

If the seams do not meet under the arm, let out the shoulder seam a little. I didn’t have a problem with this, so I moved to the next part.

After sewing all the seams you pinned, try on the cover again to check the fit. Re pin the side seams while the cover is on. You are making sure that:
– The seams hang perpendicular to the ground, and are not slanted or pulling to one side
– There is no “pinching, drawing, or compression of the bust and chest” either in the front or the back.
– The cover fits right over your bra, like a second skin
– The seams match up under your arms and the shoulders still fit well

Here is my fit test:

20131216-184156.jpg

What do you think?

The last part of step 4 is to dart out any remaining fullness in the bust. The instructions recommend this for most busts larger than a size C. I am a DD, but I didn’t need to deepen or add any darts to the bust to get the cover to fit.

Check back later this month for step 5, where I finish the bust fitting, and step 6, where I fit the back of the cover. Thank you to those of you who have commented to keep me motivated on this project!

20131217-102328.jpg

20131214-183158.jpg

Ok so I feel like I have to write one obligatory post about something Christmassy- even though I don’t do Christmas, almost everyone I know does, and I still make/buy some small presents for my friends. Also Hanukkah was unseasonably early this year, and I haven’t quite gotten my fill of winter holidays yet. So that’s my Jewish justification for making ornaments.

I made these ornaments for some friends who are map and travel lovers.

You need:
An old map
Printer paper and some colored paper
String/yarn
Plastic needle
Scissors
Rubber cement

20131214-180544.jpg

20131214-180550.jpg

Cut out a two of the same shape from the map, such as a heart, snowman, or snowflake. When you cut out the first shape, it may help to fold it in half so it is symmetrical. Use the first shape to trace and cut out the second shape so they are the same- they will eventually be glued back to back.

20131214-181128.jpg

20131214-181134.jpg

20131214-181151.jpg

Use the rubber cement to glue one of the shapes to the white paper. Wait till it dries, and then cut it out. Glue the second shape to the back, let it dry, and then even out the edges with the scissors.

20131214-181607.jpg

Since you have the glue out, now is a good time to make the message tag hanging from the bottom of the ornament. Cut out a rectangle from the colored paper and glue it in half. After it dries, write your message on it. I wrote, “Merry Xmas” on the front and “from Claire” on the back.

20131214-182323.jpg

20131214-182329.jpg

Now you connect everything with string, using the plastic needle. Cut about 11 inches of string for the top and 4 inches to connect the message tag to the ornament. Thread the plastic needle, poke it through the top of the ornament, and then tie a knot.

20131214-182756.jpg

20131214-182801.jpg

I drew a face on the snowman:

20131214-182928.jpg

That’s it! Hang them on the tree (if you have one) or in the window, or send them to your friends so they can hang them on their trees.

20131214-183148.jpg

20131211-134054.jpg

Pants alterations!! A bigger part of my life than buying Christmas presents… And since my family doesn’t do Christmas, I only buy Xmas presents for a few friends… But anyway, over the years, being short has forced me to get really good at altering pants. Long to short, wide to less wide- anything to make pants fit better and not overwhelm my small person.
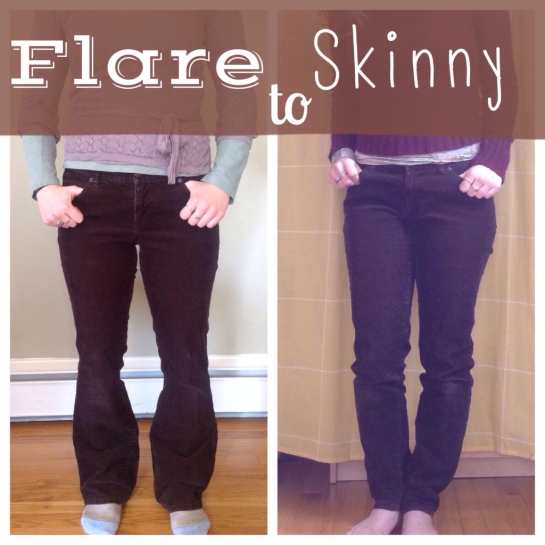
I’ve had these brown corduroy pants from Loft for about 3 years that were probably a hand me down or thrift store find. Even though they fit really well in the waist and butt, I would hardly ever wear them because I wasn’t a huge fan of the cut. When I did wear them, I felt really frumpy. Cue the flare-to-skinny alteration how-to!

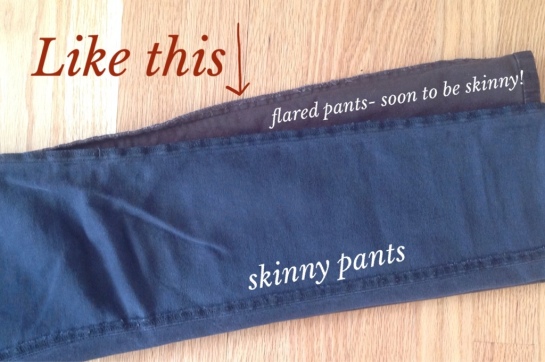
In addition to the pants you want to alter, it helps to have another pair of pants that fit the way you want them to- you will be using this as a pattern.

Turn pants inside out. On most pants, one seam is sewn flat. Don’t worry about doing anything along that seam- it is the seam on the other side of the pant leg you will sew.

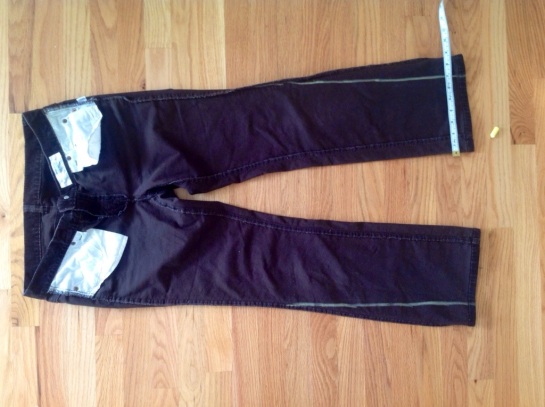
Lay the pants on the floor with the seam you are going to work on pulled flat. It should still directly out from the side of the garment with no fabric underneath it, like this:

20131130-194818.jpg

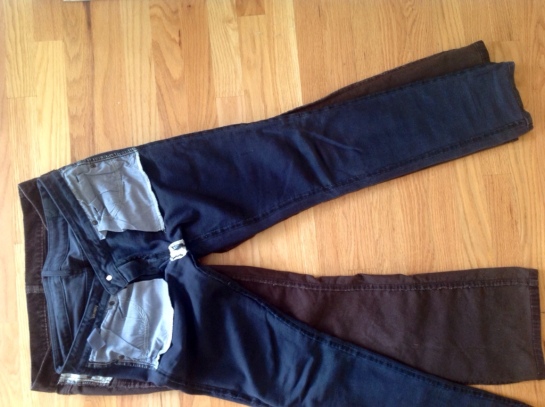
Do the same to the extra pair of (skinnier) pants, match up the crotches, and lay the skinny pants on top of the flare pants.
Then use chalk to mark the edge of the skinny pants on the flared pants.

20131130-194158.jpg

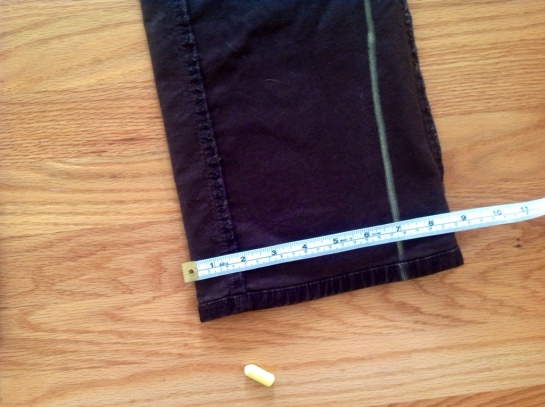
Once you have done this to both pant legs, measure the width of the pant leg from the chalk line to the edge at several points to make sure the pant legs will be even. Also measure the length from the bottom hem to the top of the chalk line to make sure the seams will end at approximately the same spot on each pant leg.

20131130-195506.jpg

20131130-194211.jpg

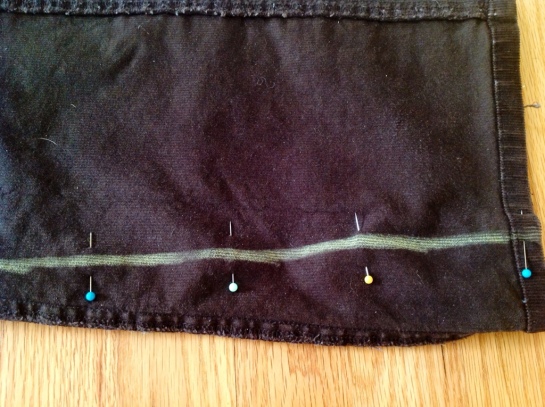
Pin along the chalk line, then sew a basting stitch on the chalk line

20131130-193853.jpg

Now, try on the pants inside out. See how it feels, if the new seam feels too tight or too loose. If it feels too tight, rip out the stitches, draw a new chalk line, and sew a new seam. If it feels too loose, mark with pins where it needs to be taken in, connect the pins with a chalk line, and then sew a new seam.

Once you are happy with the fit, cut off some of the extra fabric, turn the pants right side out, and try them on. If they still fit well, turn them inside out again and serge along the basted seam. They will look like this:

20131130-194205.jpg

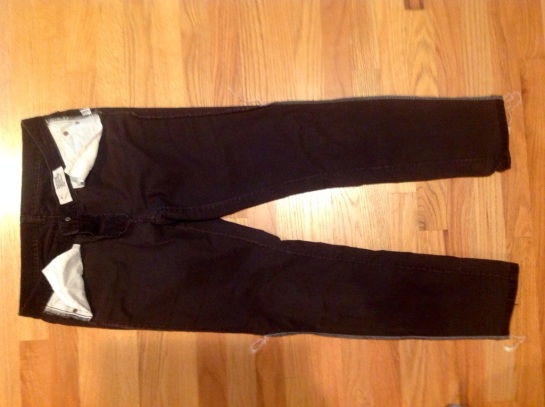
I serged with white thread so you could see what I did more easily, but I would normally use black or brown thread.

The pants may look like they are made for someone with broken knees if they had an extremely wide flare. It looks weird when they are inside out, but they usually fit fine. Few and far between are the pants that flare so much you need to take them in from both sides.

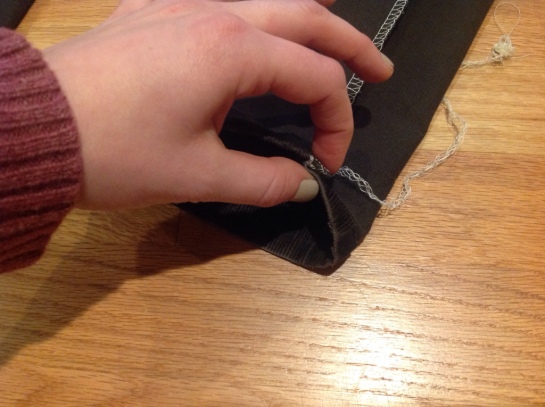
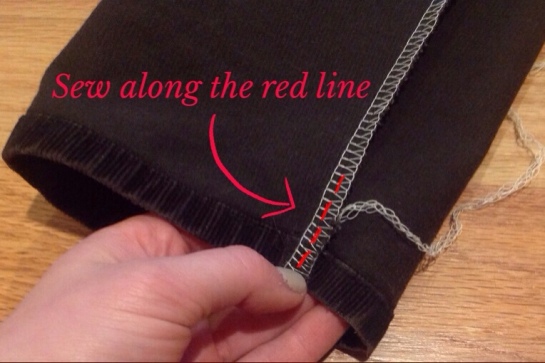
Iron down the new seam to one side. The last thing you want to do is sew a seam to hold the seam to the side. Start about 2 inches from the bottom hem, and end at the bottom hem. Sew straight down, parallel to where the fabric meets.

20131130-200353.jpg

20131130-215402.jpg

There you have it. Enjoy your new, skinnier pants!

This technique can be used to change the silhouette of pants almost any way, for example if you have wide leg pants you want to make into boot-cut. If you don’t have a pair of pants you want your new pants to look like, you can start by putting the pants on inside-out and pinning vertically along an imaginary seam. Just be careful taking the pants on and off with all the pins in them

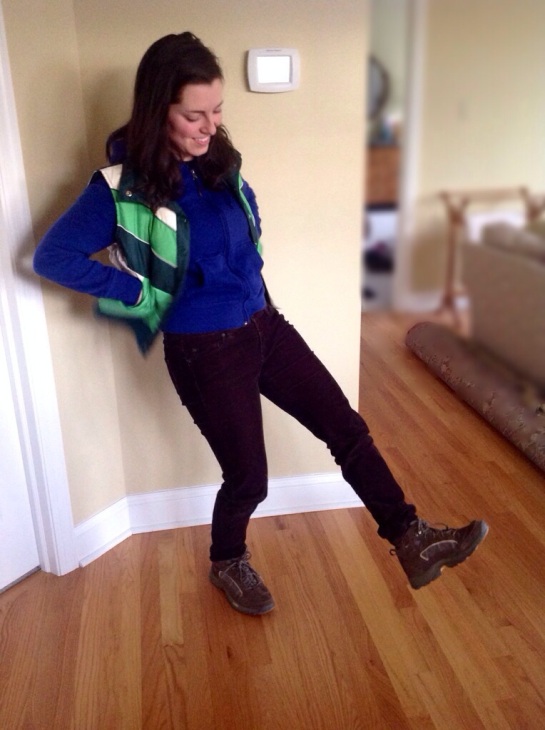
And to end this post here is a picture of me getting ready to go hiking on a sunny, snowy day. Wearing my newly skinny pants, of course.

20131211-134418.jpg

A friend mentioned something similar to this recipe, and I decided to make my own version with a sweet potato and feta (instead of a regular potato and cheddar cheese) to give it some extra pizzaz.
You need:
Sweet potato
Salsa
Black beans
Feta cheese

Prick sweet potato all over with a fork and roast it in the oven on a baking sheet at 400 F for 45 minutes or until tender. Warm up the black beans.
Let the potato cool for a few minutes, then a slice down the center and fill with black beans, salsa and feta
Enjoy!

20131205-222540.jpg

20131205-222547.jpg

20131117-163711.jpg

I bike almost everywhere around the city- school, grocery shopping, to see friends…

As the temperature drops, my ears get cold, and eventually putting my hair over them isn’t enough to keep them warm. This is a hat I made that is thin enough to fit under a helmet, and keeps out the wind chill. Because the fabric is thin I don’t get overheated in it either.

What you need:
Knit fabric
Sewing stuff

What you do:
Cut out a circle about 6.5 inches in diameter. Wrap the fabric around your head, stretching it a little, to get an idea of how long to make the part that goes around your head. Mark it and then measure the length. Cut out a piece of fabric that length (I made mine 20 inches long) and 6 inches wide in the shape of a long rectangle:

20131116-174553.jpg
This is the easiest way I know how to make a circle. 1. Start with a square, and then; 2. fold it diagonally into a triangle. 3. Fold that triangle two more times in half, until you have an ice cream cone shape. 4. Then cut a round top on the ice cream shape and; 5. unfold into a circle.

20131117-101554.jpg

Here are the pieces of the hat cut out:

20131117-163702.jpg

Serge the two short ends of the rectangle together, to make the sides of the hat.

20131117-163812.jpg

Before you serge the top (the circle) to the sides (the closed rectangle you just made), it helps to make some chalk marks. Fold the closed rectangle in halves and then quarters to find 4 points that are each exactly 1/4 of the way around the circle. Mark these with chalk. Now, fold the circle into quarters and mark those 4 points around the edge with chalk. Match chalk lines on the circle with the chalk lines on the closed rectangle and pin. Doing this makes sure you are sewing the closed rectangle evenly on to the circle.

20131117-163656.jpg

Serge the top of the hat to the sides, and be sure to take out the pins as you go- sergers and pins do not agree. You will probably need to stretch the top of the hat as you attach it to the sides.

Finally, serge the bottom hem. Sew a zig-zag stitch on the sewing machine to hold down the end of the hanging serger seam.

20131117-163650.jpg

20131117-163801.jpg

That’s it! Here is the outside of the hat with another just like it that I made in blue:

20131117-163716.jpg

I fold up a little brim on my hat in the front to keep it out of my eyes and leave it mostly unfolded in the back to cover more of my head.

20131117-163706.jpg

20131117-163737.jpg

Don’t forget a helmet! Enjoy your warm head and keep on biking.